Toyota Tundra Forums banner

Oxygen Sensor Replacement Tutorial

114K views 52 replies 32 participants last post by  shootemintheface  
#1 ·
Hi,
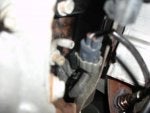
While driving the other day, my check engine light came on. After checking Tundrasolutions, I drove to my local Autozone, and bought a code reader for $65. (I live in Calif, so they would not check it for free) After I attached the code reader, I got a p0031 code. Again, looking it up on Tundrasolutions, I knew it was the bank 1 sensor 1 oxygen sensor. I took another drive to the dealer, where I had to shell out $167.00 for a new one. Now came the fun part. Replacing the old one!! The first step was to locate it. If followed the driver side exhaust, until i found the catalytic convertor. I looked in front of it, and there it was. Unhooking the plastic connector, was a challenge.

Using a super small screw driver, I lifted the tab on the bottom with one hand, and pried the connector apart with the other. Took a little while, but I was able to get it.
The next step was to get the sensor off.
Image

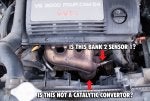
I put some oil on the top part of the sensor, and then let it drip down. I then used the slotted socket, I bought for $15.00.
Image

I slipped the wire through the slot, and with a little elbow grease, was able to take the sensor out.
Image

I then screwed in the new one, and tightened it with the socket. Last step was to use the code reader to erase the code from the Tundra. After that, I fired up the car, and took it for a test drive. No more check engine light. Took about 1 hour to do, and was not tough at all. By the time I got done, it cost me $237 but that included the code reader, and socket. If you can get a free code check, that knocks $65.00 off it. I am still not sure how much the dealer would have charged me, but I have a feeling it would be more that $237:rolleyes:
 

Attachments

#2 ·
hey thanks for the tutorial and pics! I replace my driver side last year and had a horrible experience, basically stripped the threads on the way out and had to get it re-threaded, 200 buck mistake. Now my passenger side needs to be replaced. Couple questions, how many miles do u have? Did you take it off while the manifold was hot? How much force did you apply to snap it loose?
 
#3 ·
I just did my passenger side on Friday it was a lot easier to do easy to get to. I sprayed my with WD-40 or you could use PB Blaster and stray it a few times and let it soak in and I was told to turn you car on and let it run for around 30 seconds just to get it hot I did that and helped some. I tried to do my driver side and that’s a different story started to strip the head of the sensor so now I have to take it somewhere to get fix. :mad:

Just spray it with the WD-40 or PB Blaster a few times and run the truck for 30 seconds or so and you should be good.
 
#4 ·
I just did my passenger side on Friday it was a lot easier to do easy to get to. I sprayed my with WD-40 or you could use PB Blaster and stray it a few times and let it soak in and I was told to turn you car on and let it run for around 30 seconds just to get it hot I did that and helped some. I tried to do my driver side and that’s a different story started to strip the head of the sensor so now I have to take it somewhere to get fix. :mad:

Just spray it with the WD-40 or PB Blaster a few times and run the truck for 30 seconds or so and you should be good.
hmmm...thats interesting. Seems like everyone has an easier time removing the passenger side and stripping the driver side. I already took mine to get the passenger side replaced 2 times and both times they couldn't snap it free. I had been spraying pb blaster all week too. I just wonder if they weren't putting a lot of muscle behind it in case they stripped it. They were also torching it and still weren't able to snap it free...it will be cheaper for me to get it out and if it strips, get it re-threaded for 200 again. Still cheaper than the dealer!
 
#6 ·
Hi,
I have 41 K miles on my 2003 SR5 Tundra. I thought the mileage was pretty low for the sensor to go bad. I did not heat it up before trying to get it loose. It did not seem too tough to get off, I quess I got lucky. Stripping the threads sounds like a nightmare. The slotted socket really did the trick, and was worth the 15 bucks.

pb4sc
 
#9 ·
Depends on which sensor is bad. Front sensors are far more critical to engine operation, as the ECM uses them to set air fuel ratio at much of the engine's operating range. An incorrect air fuel ratio can and would damage the engine in short order. The rear sensors apparently do not affect air fuel ratio, and exist only to monitor catalyst efficiency.
 
#10 ·
My wife has driven the 2k tundra since we purchased it new,It does not see alot of heavy foot long haul driving, and for the last 4 years goes only 5 miles each way to her job useing the 89 octane gas to save on money.I run a LUCAS injector cleaner in it once every 4 or 5 fillups. However I have always run Amsoil 5/30 in it from the jump start to help the motor out in all weather conditions at start up.Could the lack of warm ups to normal engine temps and cheap gas cause these O2 to fail so soon? .......So...., without haveing a code reader for my 2K tundra with 70k on the odometer,i will assume the the engine dash warning light will apply only to the front 2 sensors?.... or can the rears be picked up also?....I think that if only the fronts are read i will change out both front sensors at the same time and start clean as when new.I just started running a strong injector cleaner called GREASED LIGHTNING fuel treatment through a full tank of gas and was thinking of a long drive to consume the cleaner before starting over with new O2s.....Should i wait for the cleaner and a full tank of gas to pass through before i install the new O2s,...Or will i cause more problems by driving with a bad O2 waiting for the treatment cleanup.??? Thanks Steve
 
#11 ·
Toyota sent out a notice to replace Number 1 O2 sensors in the exhaust manifolds (trouble code P0135 and P0155) at their cost as an extension to the Tundra's Emissions Warranty - "2000 to MID-2002 Model Year Tundra V8 (2UZ-FE Enigine) Oxygen Sensor Warranty Enhancement Notice". Unfortunately, the warranty was for 7-years or 90K miles. Considering your milage, I would push for the warranty. If YOU must replace them , buy the O2 sensors at RockAuto Parts Catalog - the least expensive that I have found - $60.89 each for Denso Part # 2344169 OEM. Good luck!
 
#12 ·
...I would also like to add that I am now in the process of replacing mine. Before I do, I am considering the JBA headers. I have been driving my 4WD Limited around for over a month with the idiot light on and have had no problems. I suspect that a slightly lower MPG would be the result, but I have been infromed that it is the pre-heater element on the sensor that is prone to fail. So, in that case, your O2 sensor is doing its job - may be not as fast since the heating element is not warming it up quicker, but I suspect the difference is negligible. Toyota's warranty replacement of mine lasted 3 years and about 30K miles.
 
#14 ·
I've got the P0135 on my 2000 tundra 4x4. Would the Bank 1 Sensor 1 be the drivers side or passenger side?

Thanks
Bank 1 = driver's side
Bank 2 = passenger side
Sensor 1 = front (aka the "fuel-air", or "upstream" sensor; located in the exhaust manifold)
Sensor 2 = rear (aka the "oxygen", "emissions catalyst function" or "downstream" sensor; located behind the catalytic converter(s)
 
#16 ·
Check Engine Light came on last night. At the Dealer Code P0135 Bank 1 Sensor 1.. Total Replacement Cost $286.96 (I had a $30 Coupon)... (2000 Toyota Tundra 97000 Miles).. At almost 23000 miles the Dealer replaced the Bank 2 Sensor 1 (Code P0130) under warranty..
 
#17 ·
Check Engine Light came on last night. At the Dealer Code P0135 Bank 1 Sensor 1.. Total Replacement Cost $286.96 (I had a $30 Coupon)... (2000 Toyota Tundra 97000 Miles).. At almost 23000 miles the Dealer replaced the Bank 2 Sensor 1 (Code P0130) under warranty..
You can pick up a new Denso plug-and-play sensor from Rockauto for about $62 and you can do the remove/replace yourself. $287 to do the job is absolute robbery.
 
#19 ·
You actually have to so it doesn't seize or rust in. Just use sparingly so nothing get onto the sensor part that goes inside the exhaust pipe. Just a little around the thread. Use of PB Blaster for several days and running cold engine for a minute or so is highly recommended as it eases removal of old sensor.

I got P0155 today so I'm ordering one online ASAP. Autozone is 109+tax :eek:
 
#21 ·
Bank 1 = driver's side
Bank 2 = passenger side
Sensor 1 = front (aka the "fuel-air", or "upstream" sensor; located in the exhaust manifold)
Sensor 2 = rear (aka the "oxygen", "emissions catalyst function" or "downstream" sensor; located behind the catalytic converter(s)
I got a P1074 code which says it's a Sensor 1 Bank 2.

Where exactly is that? When standing infront of the vehicle and looking down at the engine, where should I look?

Also, can someone tell me which of the following I will need?

Bosch Spark Plugs: Automotive spark plugs, Motorcycle sparkplugs, high performance plugs

or

Bosch Spark Plugs: Automotive spark plugs, Motorcycle sparkplugs, high performance plugs

I failed emissions today, horribly. HC ppm reading was 910 (150 is the limit) and CO% was 6.86 (0.70 is the limit). I've changed the oil before the test and after the test I cleaned the MAF sensor (which was pretty dirty). I'm hoping maybe the dirty MAF sensor was the culprit but I'll change the 02 Sensor just in case.

Can someone help please? I have 1-1/2 weeks before my sticker expires. :(

Thanks.

Edit, I've attached a photo:

Image
 

Attachments

#22 ·
Anyone have clue what size the hex nuts are for the rear O2 sensor on the 2002 Tundra? My check engine light came on a while ago and have been driving around with a failed inspection sticker since January. I never checked until now...weather don't ya know...under the truck to see the sensor. Both nuts were gone. The rattling I've been hearing was the cowling that goes over the sensor...it was just sitting there. The new sensor I have won't allow the cowling to sit over it so wondering if just getting the hex nuts and tightening the old O2 sensor will do the trick. Every hex nut I've tried here at the house has different threads...must be a metric thing. Thanks.
 
#23 ·
Its 7/8 Just buy deep(like 4") 7/8 socket, cut the wires off the bad sensor or even some of the skinny part by the wires and remove it. Use OEM DENSO because people were/are having problems with Bosch O2 sensors
 
#24 ·
Its 7/8 Just buy deep(like 4") 7/8 socket, cut the wires off the bad sensor or even some of the skinny part by the wires and remove it. Use OEM DENSO because people were/are having problems with Bosch O2 sensors
He's talking about the rear (downstream) sensors which are mounted using two 12mm, 6-point locknuts. Get them from your dealer.
 
#25 ·
I replaced both front O2 sensors on my 2001 Tundra last week & it went smoothly. All I can say is make sure to spray them with PB blaster or WD-40 & let it do it's thing. Hardest part was getting the leverage to loosen the old sensors & also needed a 10" + 6" socket extension to reach the driver's side sensor. The electrical connector actually was easy for me & just manipulated my fingers to work them off. Just follow the advise here & the nice tutorial Remmy700p put together & it should be fairly painless.
 
#26 ·
Awesome thread, guys! My check engine light lit up a couple days ago. The beloved Scan Gauge II said I had a P0031. After researching and landing on this thread, I headed off to get my parts. My parts guy @ Fred Haas Toyota World said their were two parts, one with a blue tag and one without. He said to check and see which one I had. Of course, that meant getting dirty and I was not ready for that yet. LOL

I asked him if he could sell me both parts and if I could bring back the wrong one. He said no problem, except he only had the one in stock. I was on my way by the store, so I whipped in and bought the one he had. Next, I went to O'Reilly Auto Parts to borrow their slotted socket. I picked up some dielectric grease while I was there. When I had my headers installed a long time ago, the CEL came on with the same code and the installer just put some of that grease in the connection and it worked fine. I figured an ounce of prevention....

So, off to the driveway. After moving my wife's Sequoia out so I could use it for parts runs if needed, I pulled mine up, got out the tools, squirted the requisite WD40 and then went to the back yard to do some hedge trimming of our hibiscus plants that froze last winter while the WD40 did its thing.

After coming back, I decided that I needed to remove my Skid Row skid plates to get better access, so the front and middle ones came off. I then learned that my part didn't have the blue tag. Ooops. The one they parts guy sold me did. By this time it was after 5:00 p.m. and he said he could not even order it until Monday, which meant arrival Tuesday. Then he said pull it off and check the part number.

Fortunately, I had no trouble getting it off after breaking the sensor loose with the short stubby socket. After wrangling a bit until I figured out how to release the connection, I switched sockets to the tall one, and twisted it right off. After inspection, my part number was the exact same one I had picked up earlier. WHEW! I guess the blue tag has come off after 156,000 miles.

I stuck some grease on the connector, cleaned the female threads on the headers, and screwed it in hand tight. I reached for the tall socket and finished the tightening and torquing. All was good. Then I had to figure out how it connected back. This was almost the most tedious part. LOL

After getting that resolved, I fired it up, cleared the code with my Scan Gauge II, and turned it back off. Fired it up again, and no CEL. Wheeeeee!

After gathering up the hibiscus branches I had pruned and cleaning up the tools, I took it for a longer test drive to get the branches to the dump and take the tools back to O'Reillys. No CEL.

The OEM part cost $123 at the dealer. Parts and labor would have been at least 3X-4X that had I had the dealer fix it. With the exception of the soak time, the whole thing probably took me only 1.5 hours. Of that, almost an hour was screwing with my abused skid plates. In fact, the last dudes that put them on after replacing my steering gear rack had FUBAR'd the threaded nut inside the frame and replaced it with another, not welded to the frame. Oh my gosh, that was a pain to get that bolt back together with that nut.

Thanks for all the help, guys. GREAT THREAD. Once again, Tundrasolutions saves the day (and lots of $$$).


.
 
  • Like
Reactions: T23