So I couldn't figure out how to post in the installation and how-to forum so I figure I might as well post here and if it gets moved, you guys know where to find it ") I decided to do a little write up on how to install the polyurethane steering rack bushings on the 2000-2006 Tundras. I didn't search around to see if there was another write up but hey, the more how-to's the better.
I decided to do a little write up on how to install the polyurethane steering rack bushings on the 2000-2006 Tundras. I didn't search around to see if there was another write up but hey, the more how-to's the better.
This is a fairly easy job, takes about an hour to do and minimal tools are required. I would recommend doing this job PRIOR to having an alignment done as installing these bushings will change your alignment. Use the pictures in conjunction with this write-up, it will all make sense once you are under the truck, the pictures are posted in sequence. Keep in mind I only did the center bushing and driver side as I had these sitting in my toolbox from a few years back and didn't want to buy a whole new kit just to get one more bushing. The passenger side U shaped bushing is the easiest of the three to replace and I figured most of you didn't need explanation on how to replace it. So, on to business…
You will need:
- 1/2 wrench with 6 inch extension
- 19mm socket
- 22 mm socket
- razor knife
- hammer
Tools you may need:
-Long screwdriver or prybar of some kind
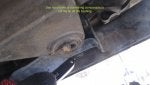
I started by jacking the truck up to gain some extra clearance to work with. For those of you who have lifts this probably won't be necessary. Begin by removing the 22mm nut, use a rubber mallet or thread the nut back on the bolt and use the 22mm socket and hammer to tap it a few times to loosen it up. The bolt should pull out freely however if it does not perhaps some PB blaster or heat will coax it out. Remove the center bolt, it is a 19mm accessed from the top of the rack. 1/2 socket wrench and short 19mm should do the trick. This is the most difficult bolt of the four to remove as space is limited; like I said before though a 1/2 socket wrench and SHORT 19mm are perfect for the job. DO NOT attempt to break the center nut loose as it is welded (see picture). On the passenger side remove both the 19mm nut and bolt, the U-Shaped piece will pull away from the rack and this bushing is split so it is very easy to remove and replace. At this point the rack should be loose, you might have to use a large screwdriver or something comparable to wiggle the rack back and forth enough to get some play in it but what you are looking for is about 2-3 inches of play which is sufficient to replace the bushings. I used a razor knife to cut the lip off the bushings, some say they have used torches to melt them out however I would be hesitant to use that kind of heat on an aluminum rack. Once the lip is gone I used one of the 19mm bolts that I removed in conjunction with the 19mm socket (and extension if need be) to pound out the bushings (see picture). As they say there is more than one way to skin a cat so whatever works for you to remove the bushings is fine, I just found this method to work for me. The driver side bushing is by far the hardest to remove, the center bushing comes out rather easy.
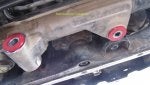
From here you are ready to install your new poly bushings, the bushings are split in two so I installed half of the bushing, inserted the metal sleeve (I used white lithium grease to assist in this process) and then installed the other half of the bushing. They go in fairly easy so you shouldn't have any problems. The passenger side U shaped bushing just pulls off and installation of the new poly bushing is as easy as the removal, no tools needed. Push the rack back into place and re-install bolts and nuts, torque specs are 123 ft lbs for 19mm, 96 ft. lbs on the 22mm. Take it for a test drive and see how you like it, steering will feel a bit tighter and more responsive, again its not a huge difference but certainly one that is worth the $40 and an hour or two of your time.
I decided to do a little write up on how to install the polyurethane steering rack bushings on the 2000-2006 Tundras. I didn't search around to see if there was another write up but hey, the more how-to's the better. This is a fairly easy job, takes about an hour to do and minimal tools are required. I would recommend doing this job PRIOR to having an alignment done as installing these bushings will change your alignment. Use the pictures in conjunction with this write-up, it will all make sense once you are under the truck, the pictures are posted in sequence. Keep in mind I only did the center bushing and driver side as I had these sitting in my toolbox from a few years back and didn't want to buy a whole new kit just to get one more bushing. The passenger side U shaped bushing is the easiest of the three to replace and I figured most of you didn't need explanation on how to replace it. So, on to business…
You will need:
- 1/2 wrench with 6 inch extension
- 19mm socket
- 22 mm socket
- razor knife
- hammer
Tools you may need:
-Long screwdriver or prybar of some kind
I started by jacking the truck up to gain some extra clearance to work with. For those of you who have lifts this probably won't be necessary. Begin by removing the 22mm nut, use a rubber mallet or thread the nut back on the bolt and use the 22mm socket and hammer to tap it a few times to loosen it up. The bolt should pull out freely however if it does not perhaps some PB blaster or heat will coax it out. Remove the center bolt, it is a 19mm accessed from the top of the rack. 1/2 socket wrench and short 19mm should do the trick. This is the most difficult bolt of the four to remove as space is limited; like I said before though a 1/2 socket wrench and SHORT 19mm are perfect for the job. DO NOT attempt to break the center nut loose as it is welded (see picture). On the passenger side remove both the 19mm nut and bolt, the U-Shaped piece will pull away from the rack and this bushing is split so it is very easy to remove and replace. At this point the rack should be loose, you might have to use a large screwdriver or something comparable to wiggle the rack back and forth enough to get some play in it but what you are looking for is about 2-3 inches of play which is sufficient to replace the bushings. I used a razor knife to cut the lip off the bushings, some say they have used torches to melt them out however I would be hesitant to use that kind of heat on an aluminum rack. Once the lip is gone I used one of the 19mm bolts that I removed in conjunction with the 19mm socket (and extension if need be) to pound out the bushings (see picture). As they say there is more than one way to skin a cat so whatever works for you to remove the bushings is fine, I just found this method to work for me. The driver side bushing is by far the hardest to remove, the center bushing comes out rather easy.
From here you are ready to install your new poly bushings, the bushings are split in two so I installed half of the bushing, inserted the metal sleeve (I used white lithium grease to assist in this process) and then installed the other half of the bushing. They go in fairly easy so you shouldn't have any problems. The passenger side U shaped bushing just pulls off and installation of the new poly bushing is as easy as the removal, no tools needed. Push the rack back into place and re-install bolts and nuts, torque specs are 123 ft lbs for 19mm, 96 ft. lbs on the 22mm. Take it for a test drive and see how you like it, steering will feel a bit tighter and more responsive, again its not a huge difference but certainly one that is worth the $40 and an hour or two of your time.